Raspberry Pi: How to run Apache Karaf 4.2 Docker Container
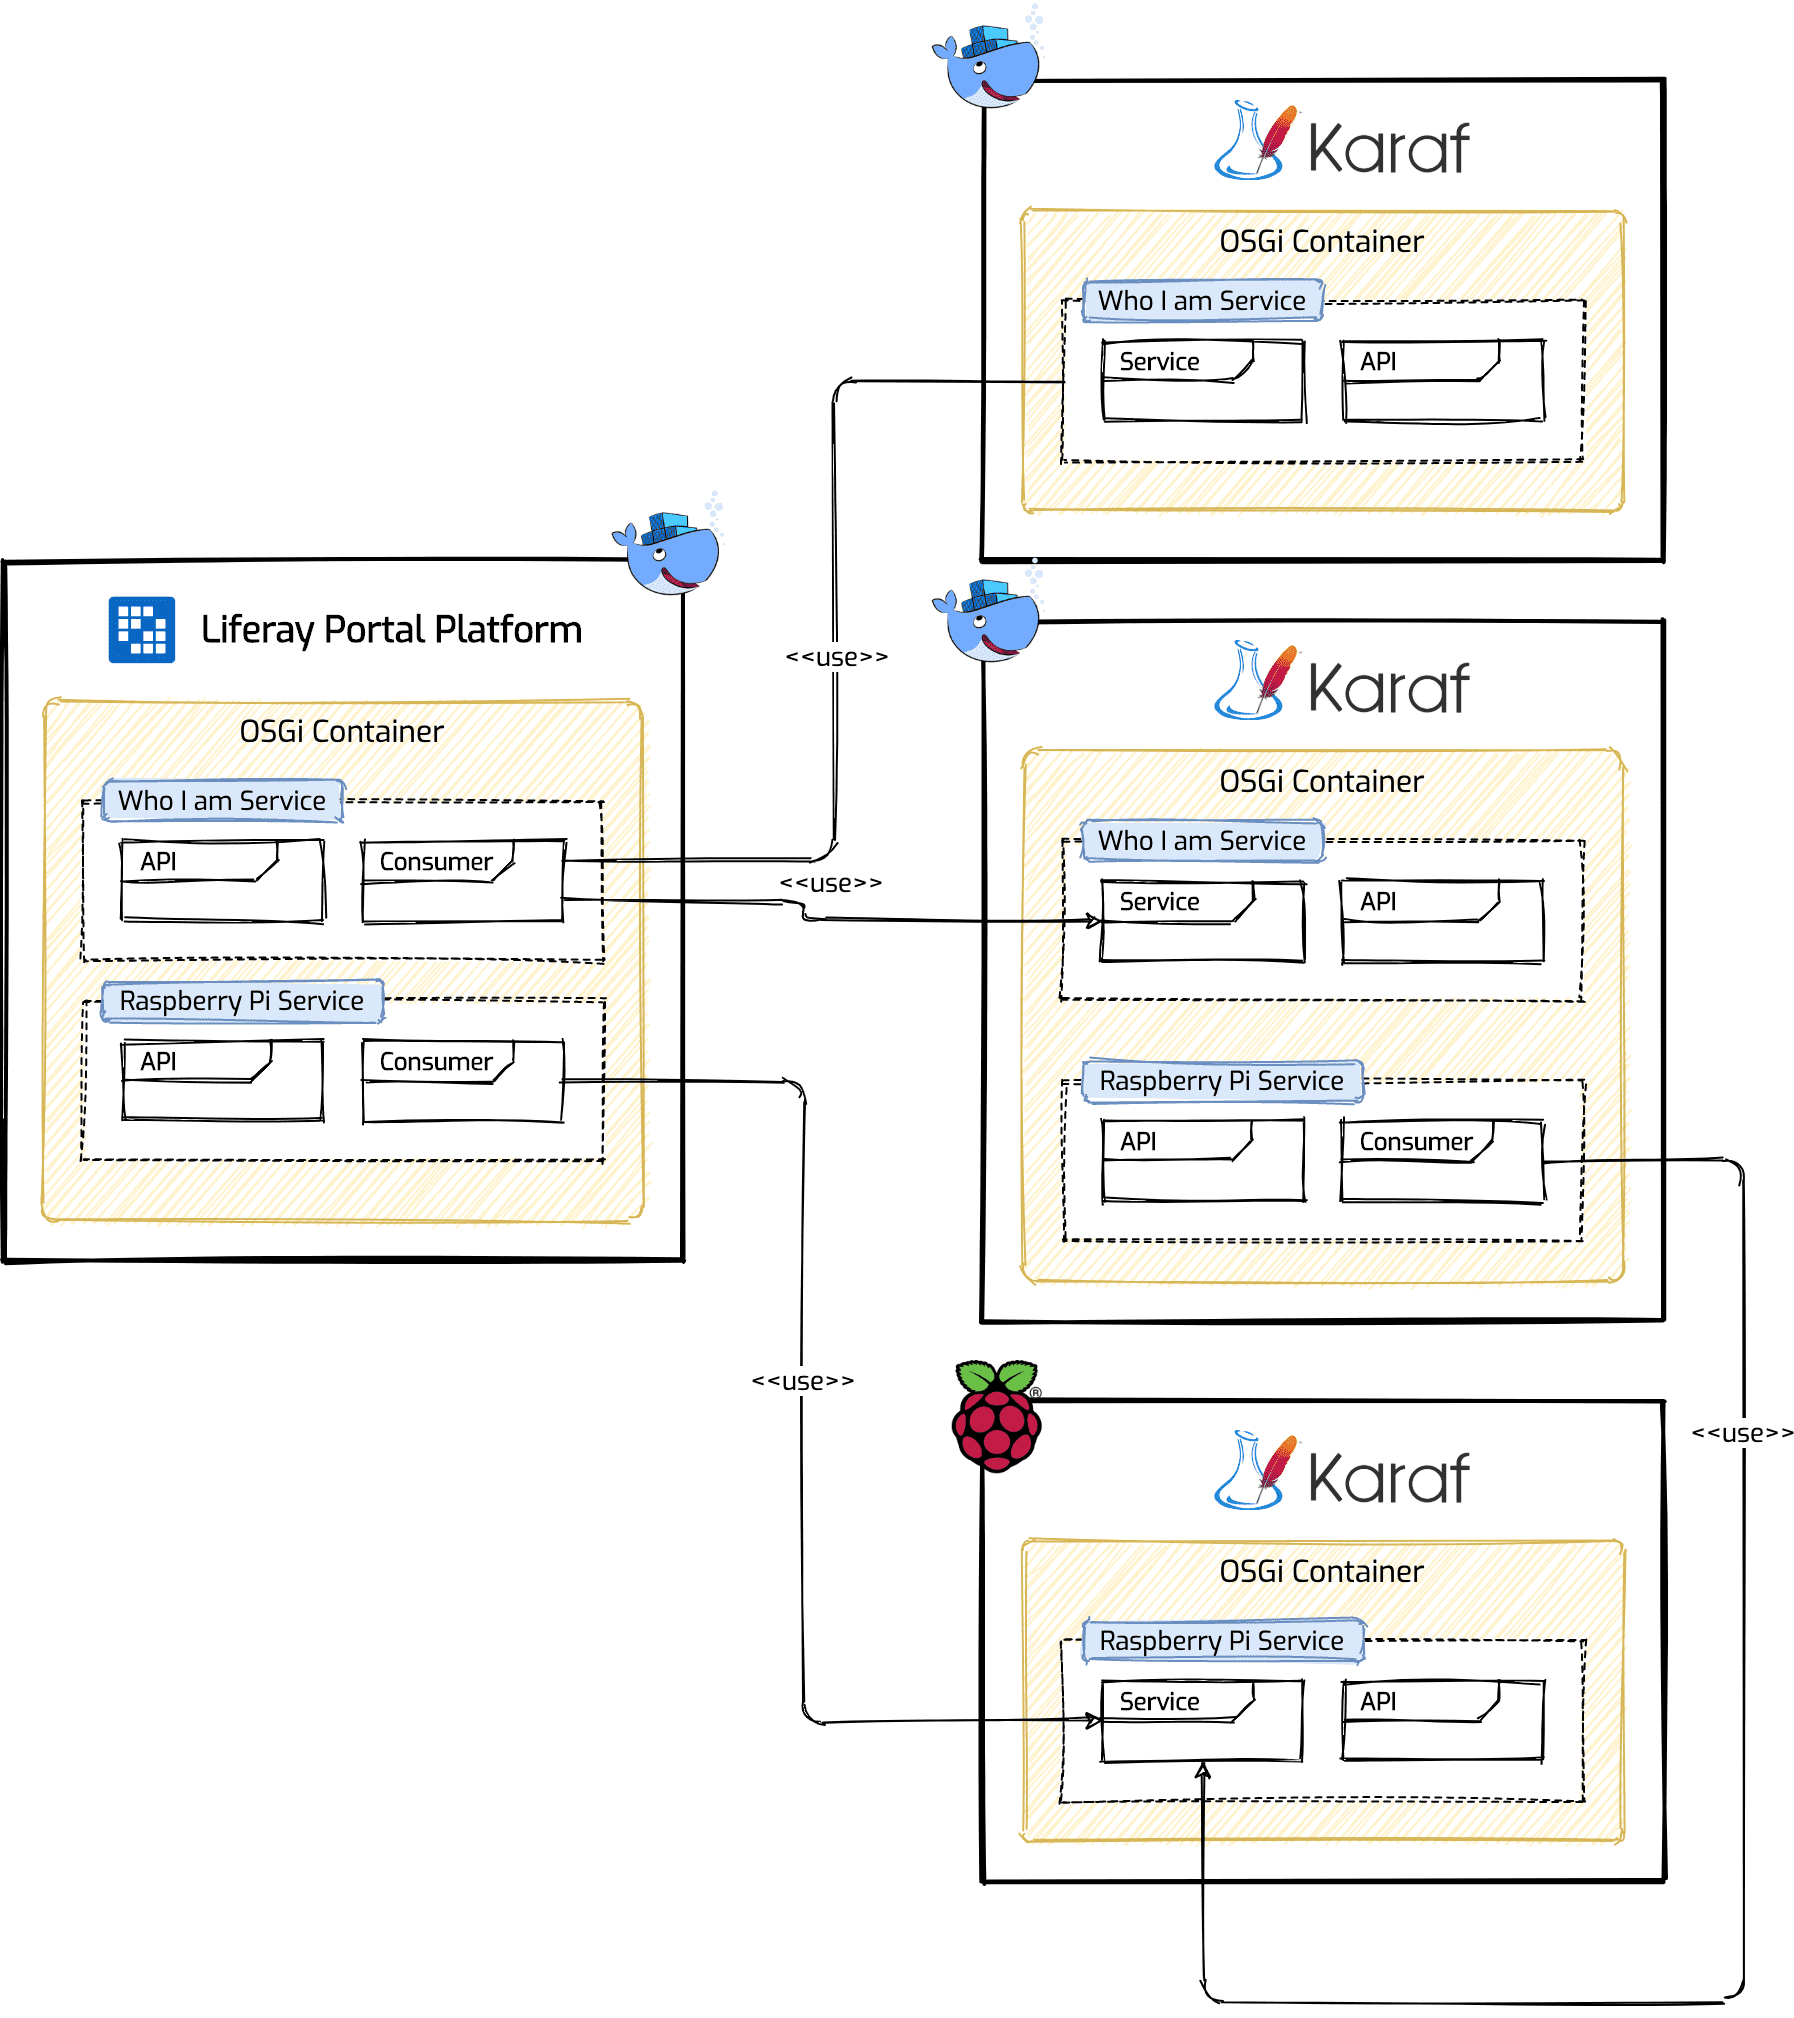
A few days ago on the SMC Tech Blog I published the article What are OSGi Remote µServices, whose goal is to show how the OSGi framework can be used effectively in the context of Microservices. The example scenario of Remote µServices proposed in the article (see figure below), provides that one of the OSGi containers is running on the Raspberry Pi.
Have you ever thought about running one or more Docker Containers on your Raspberry Pi? In this article we will see how to run an instance of Apache Karaf 4.2 in the form of a Container on the Raspberry Pi.
1. Requirements
Let's see what are the necessary requirements so that it is possible to achieve our goal. In this case we are talking about requirements in terms of both hardware and software. As for the hardware we take into consideration the Raspberry Pi and the 3 Model B+ version as a reference model.
The Raspberry Pi 3 Model B+, even if with 1GByte of RAM memory, can be used safely in a Docker context, obviously, we must consider the fact that the resources required in hardware terms to run the applications are higher than to run them directly ( without the help of Docker).
An important note. From the moment we decide to containerize our applications on the Raspberry Pi, we need to be aware that we face some restrictions, such as direct access to the GPIO system.
For writing this article I used the following hardware.
- Raspberry Pi 3 Model B+ (CPU ARM Cortex-A53 64 bit quad-core 1.4GHz with 1GByte RAM)
- Raspberry Pi 4 (CPU ARM Cortex-A72 64 bit quad-core 1.5GHz with 8GByte RAM)
Certainly the Raspberry Pi 4 bodyworked with 8GByte of RAM memory leaves a lot of space for the execution of multiple applications using Docker; we are not limited to Apache Karaf only but we could build an entire stack of services (web server, database, application server, etc.).
As for the basic software requirements we limit ourselves to considering the operating system installed on the Raspberry Pi. I generally recommend installing Raspberry Pi OS, a free Debian-based operating system optimized for the Raspberry Pi hardware. The latest version available at the moment was released in May 2020 with Kernel version 4.19 (Debian Buster), this will be our reference version. Usually I prefer the installation of the Lite version to the Desktop version.
Both Raspberry Pi models have the 64-bit processor, so it would be possible to install the 64-bit operating system. On version 3 it makes no sense to install the 64-bit operating system since the available RAM memory is 1GByte. It would make sense to install the 64-bit version of the operating system on the Raspberry Pi 4 for the model with 8GByte of RAM.
Right now the 64-bit version of Raspberry Pi OS is only available in beta. Our reference version will still be the 32-bit version. The post Raspberry Pi OS (64 bit) beta test version on the official forum explains where to download the 64 bit version and the installation procedure.
Before going further, let's make sure that no updates have been released for the Raspberry Pi OS distribution in the meantime, in case we proceed with the update. We can update the distribution using the command sudo apt update && sudo apt dist-upgrade.
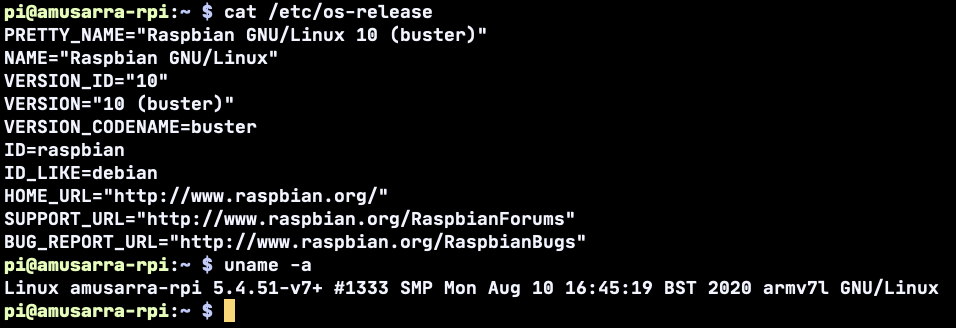
The figure below shows the contents of the /etc/os-release file and the output of the uname -a command. Note the update of the Kernel version, from version 4.9 to version 5.4.
Once we are confident that the operating system requirements are met, we can proceed with installing Docker Community Edition on the Raspberry Pi.
2. Docker installation
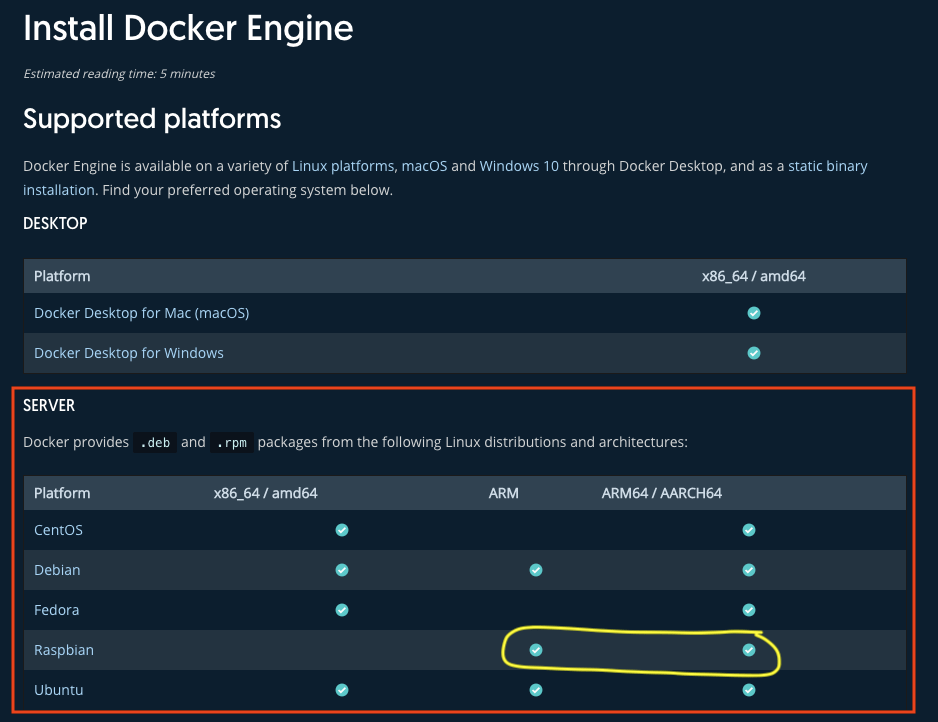
Docker Engine installation is supported on Raspbian (Raspberry PI OS). For Raspberry Pi OS, the installation method using the repositories (as indicated in the documentation) is not supported, but the so-called convenience script method. Docker Engine is supported for the x86_64 (or amd64), armhf, and arm64 hardware architectures. The figure below shows the list of software platforms (operating systems) supported for Docker Engine installation.
The installation procedure using the convenience script is really simple and ends in a few simple steps that are shown below. In any case, I recommend reading the Docker documentation carefully about this installation method.
# Download the installation script
$ curl -fsSL https://get.docker.com -o get-docker.sh

# Run the installation
$ sudo sh get-docker.sh

# If you wish to use Docker as a non-root user,
# you should now consider adding your user
# to the "docker" group
$ sudo usermod -aG docker your-user
Below is part of the output you should get by running the get-docker.sh installation script. From the final output we can identify the version of Docker Engine installed, which in this case is 19.03.12 and the more curious can read the release notes. As also indicated at the end of the installation, we can proceed with the execution of the command that will avoid us using the sudo before each docker command. Remember that this is an option, activate it or not, it depends on your needs often related to security issues.
...
# Executing docker install script, commit: 26ff363bcf3b3f5a00498ac43694bf1c7d9ce16c
+ sh -c apt-get update -qq >/dev/null
+ sh -c DEBIAN_FRONTEND=noninteractive apt-get install -y -qq apt-transport-https ca-certificates curl >/dev/null
+ sh -c curl -fsSL "https://download.docker.com/linux/raspbian/gpg" | apt-key add -qq - >/dev/null
+ sh -c echo "deb [arch=armhf] https://download.docker.com/linux/raspbian buster stable" > /etc/apt/sources.list.d/docker.list
+ sh -c apt-get update -qq >/dev/null
+ [ -n  ]
+ sh -c apt-get install -y -qq --no-install-recommends docker-ce >/dev/null
+ sh -c docker version
Client: Docker Engine - Community
 Version:           19.03.12
 API version:       1.40
 Go version:        go1.13.10
 Git commit:        48a6621
 Built:             Mon Jun 22 15:53:41 2020
 OS/Arch:           linux/arm
 Experimental:      false

Server: Docker Engine - Community
 Engine:
  Version:          19.03.12
  API version:      1.40 (minimum version 1.12)
  Go version:       go1.13.10
  Git commit:       48a6621
  Built:            Mon Jun 22 15:47:34 2020
  OS/Arch:          linux/arm
  Experimental:     false
 containerd:
  Version:          1.2.13
  GitCommit:        7ad184331fa3e55e52b890ea95e65ba581ae3429
 runc:
  Version:          1.0.0-rc10
  GitCommit:        dc9208a3303feef5b3839f4323d9beb36df0a9dd
 docker-init:
  Version:          0.18.0
  GitCommit:        fec3683
If you would like to use Docker as a non-root user, you should now consider
adding your user to the "docker" group with something like:

  sudo usermod -aG docker your-user

Remember that you will have to log out and back in for this to take effect!

WARNING: Adding a user to the "docker" group will grant the ability to run
         containers which can be used to obtain root privileges on the
         docker host.
         Refer to https://docs.docker.com/engine/security/security/#docker-daemon-attack-surface
         for more information.
...
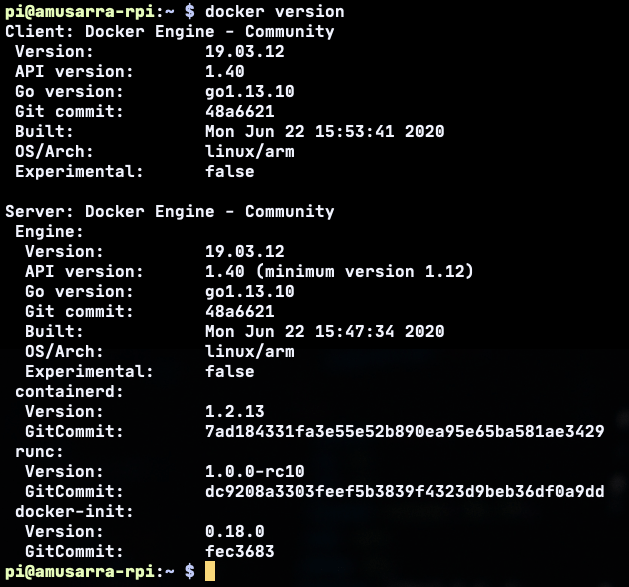
In case you have run the command that adds your user (for example the default one pi) to the docker group, before running any other Docker related commands, you should log in again. Once logged in again, we run the docker version command to verify that there were no problems during the installation phase. The figure below shows what you should get from executing the indicated command.
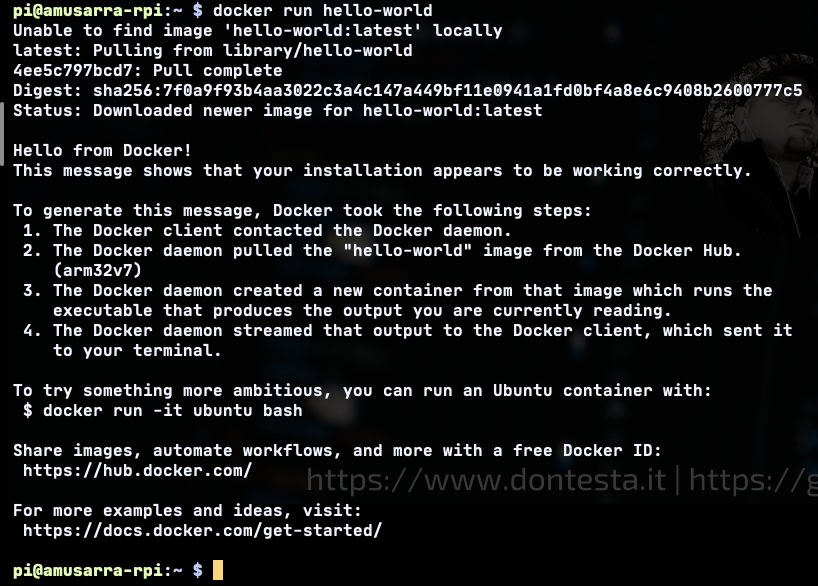
We verify by running the docker run hello-world command that the Docker hello-world image is correctly downloaded from Docker Hub, the container is correctly created and executed. Running the command without errors indicates that:
- the Docker client contacted the Docker daemon;
- the Docker daemon pulled the hello-world image from the Docker Hub (arm32v7);
- the Docker daemon created a new from that image runs the executable that produces the output you are currently reading;
- the Docker daemon streamed that output to the Docker client, which sent it to your terminal.
The figure below shows the output you should get from running the docker run hello-world command. The last check we could do is that of the container created from the hello-world image using the command docker container ls -a.
The installation script foresees the configuration of Docker Engine as a service, this means that from this moment on, Docker Engine will be started at every Raspberry Pi boot and in any case the service can be managed through systemctl. The following figure shows the output of the sudo systemctl status docker command which gives us information about the status of the Docker Engine service.
I recommend referring to the Post-installation steps for Linux document. This section of documentation contains all those optional procedures for configuring Linux hosts to make Docker work best. Not only that, this document is also useful in case of troubleshooting.
I would say that at this point Docker Engine after the appropriate checks that we have followed seems to work properly, so we can go further with the installation and execution of the Apache Karaf 4.2 Docker image.
3. Apache Karaf Docker Image Setup
The official apache/karaf image only supports the linux/amd64 architecture, this means that we cannot use this image on our Raspberry Pi (both version 3 and version 4).
So is it feasible to run Apache Karaf as a Docker container?
Of course! I have prepared the amusarra/karaf image which can be used exclusively for ARM architectures (linux/arm/v7 and linux/arm64) and which includes Java 11 instead of Java 8. The Docker image is available and ready for use on my Docker Hub repository. The figure below shows all the details. The Apache Karaf version is 4.2.9.
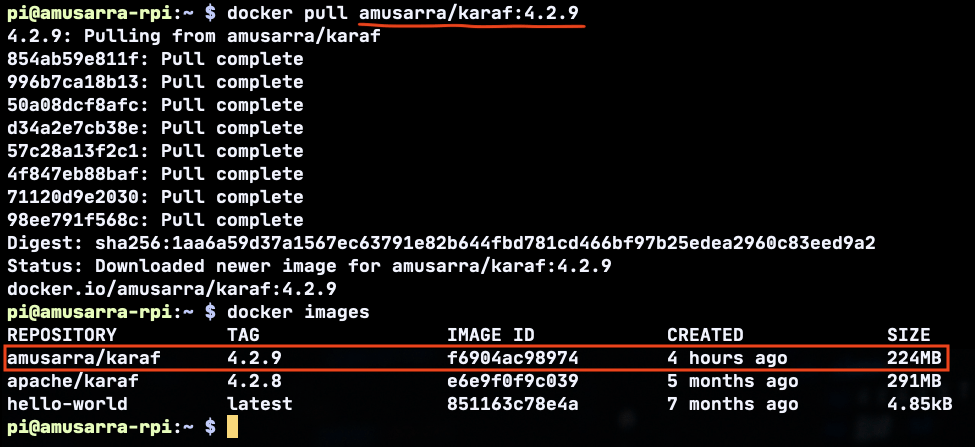
Let's proceed with the docker pull amusarra/karaf:4.2.9 command to pull the image. At the end of the pull operation, we will locally have the Apache Karaf 4.2.9 image for linux/arm. We can verify the actual architecture using the command docker image inspect --format "{{.Os}}/{{.Architecture}}" amusarra/karaf:4.2.9, whose expected output should be: linux/arm. The figure below shows the image pull operation and then the list of Docker images we have locally, among which the new amusarra/karaf:4.2.9 image is highlighted.
Very well! All that remains is to run the amusarra/karaf:4.2.9 image using the command below (the first in the list). On Run Apache Karaf 4.2.9 on Raspberry Pi 3 Model B+ (ARM/v7) you can see the entire sequence of commands being executed.
# Run the docker image amusarra/karaf:4.2.9
$ docker run -d --name karaf -p 8101:8101 amusarra/karaf:4.2.9

# View the container Apache Karaf
$ docker container ls

# View the log in tail mode
$ docker logs -f karaf
4. Connection to the Apache Karaf console
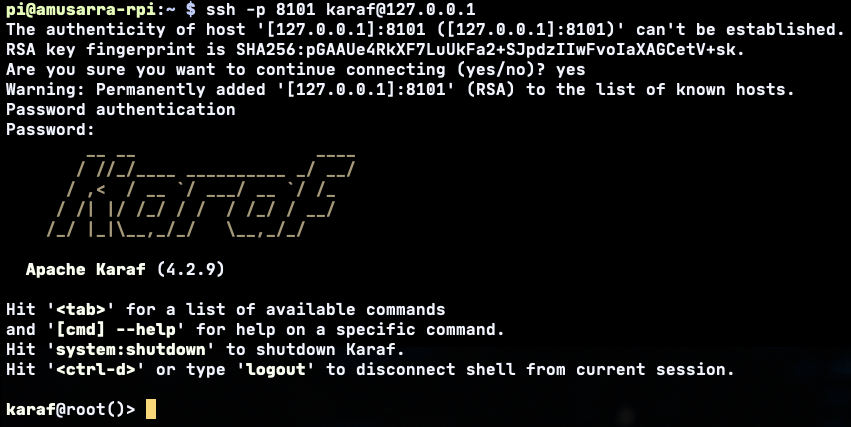
Now that the Apache Karaf instance is active in the form of a Docker container, we can try to connect to the Apache Karaf console via ssh. The standard and exposed console port (see docker run command) is 8101. Using the command ssh -p 8101 karaf@127.0.0.1 directly from the Raspberry Pi shell, we should get access to the Apache Karaf console. The default console login password is karaf.
The figure below shows the successful connection to the Apache Karaf console via ssh. It is possible to connect to the console even outside the Raspberry Pi shell, the important thing is to check that there are no network rules that can prevent the connection. On Connect to Apache Karaf Console (running on Raspberry Pi) via ssh it is possible to see the entire sequence of connection to the Apache Karaf console from a machine on the same network as the Raspberry Pi.
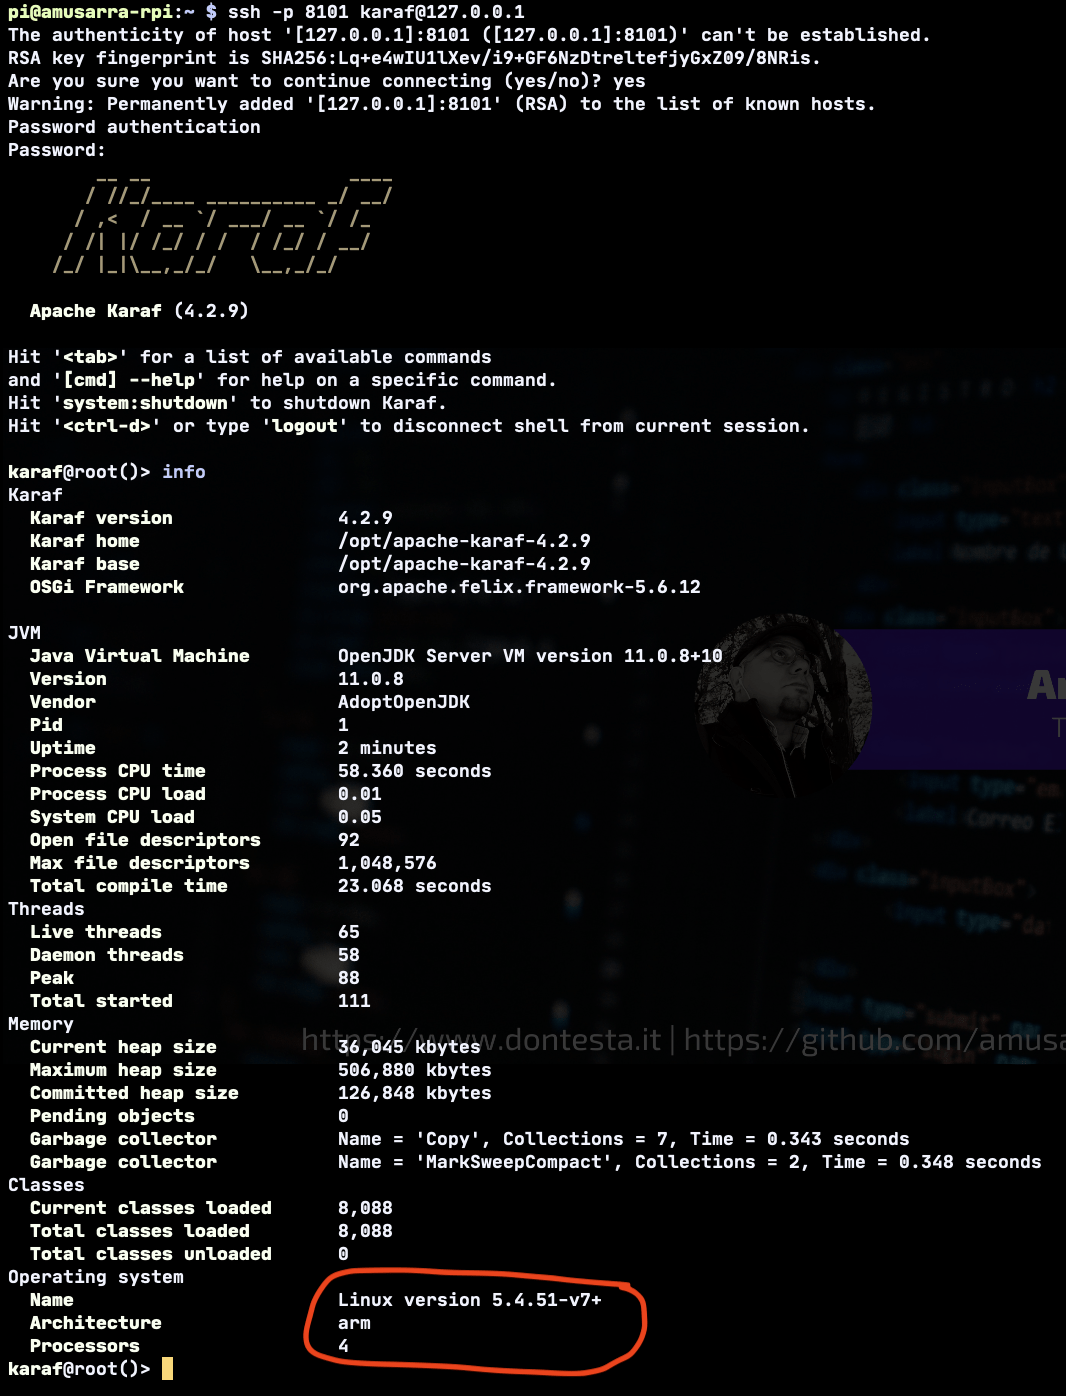
At this point we make a final check that everything is in order. From the Apache Karaf console, type and run the info command. This command returns system information of the runtime on which the Apache Karaf instance is running.
- General information on Apache Karaf.
- Information on JVM.
- Information on Threads.
- Information about memory allocation.
- Information about the java class.
- Information on Operating System.
What we should get from the output of the info command is shown in the figure below. Note the Operating System section, where the ARM architecture and the four processor cores (in this case the Cortex-A53 of the Raspberry Pi 3 Model B+) are evident.
5. Apache Karaf Web Console installation
Now that our Apache Karaf instance is running as a Docker container, let's try installing something useful, like the Apache Karaf web console. The installation procedure is really simple, it is a feature of Apache Karaf.
The Web Console provides a graphical web GUI to view and manage the Apache Karaf OSGi container. You can use the Web Console for the following purposes:
- manage the features of Apache Karaf;
- manage OSGi bundles;
- manage instances;
- manage configurations;
- manage the Service Registry.
The Web Console is extendable through a plugin system. Some applications can add new pages to the WebConsole. For example, Apache Karaf Cellar provides additional pages for administering cluster groups, nodes, etc.
The installation of the Web Console consists of the following steps.
- Removal of the previous container. This operation is necessary because now the new container will also have to expose port 8080, on this the Web Console will be in listen.
- Creation and start of the new container so that it exports port 8080.
- Connect to the Apache Karaf console via ssh.
- Install the Web Console using the
feature:install webconsolecommand. - Connect to the Web Console via browser at http://<ip-raspberry-pi>: 8080/system/console. The default login credentials are karaf/karaf.
The two figures below show some of the information that the Web Console can offer, in this case the bundles installed on the system and system information are displayed.
Below you can see the sequence of all the steps that have been performed on the system to successfully install the Apache Karaf Web Console (Install WebConsole on Apache Karaf - running on Raspberry Pi).
6. Conclusions
Did you think that Docker could also be installed on ARM hardware architectures?
Thanks to the partnership between Docker and ARM (see Docker announced a partnership with Arm) announced in April 2019, today we were able to run the Apache Karaf Docker container on the linux/arm architecture of the Raspberry Pi.
Thanks to buildx (from Docker) we can then create multi-arch images for both ARM and x86 using Docker Desktop. Using buildx, I was able to prepare the Apache Karaf image for linux/arm64 and linux/arm/v7 which we then used to install the Apache Karaf service on the Raspberry Pi.
It is also thanks to this partnership that it was possible to install Docker also on the Raspberry Pi, and as you have noticed it is a very simple procedure to complete successfully.
This possibility opens up a myriad of paths towards really interesting solutions and the one I wanted to present in this article is one of many. Some have been dubious about the Raspberry Pi 4's output with 8GByte of RAM, in the sense that in their opinion it is too much memory; what can you do with it! Here, with all this RAM available, a 64 bit operating system and Docker, the interesting things to develop are certainly not lacking.
In a future article I will show you how I built the Apache Karaf image for ARM using Docker's buildx tool. While waiting, I invite you to comment on the article if you want to ask questions about the content you have just read.
